
The Torc of the Druid Shaman
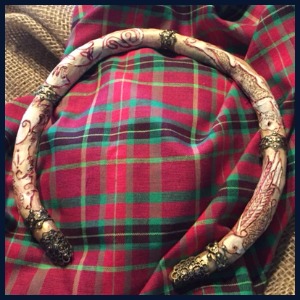
The ivory torc is the ornament of office for the Druid Shaman in The Celtic Prophecy series. It is the tether between the Shaman and his totem animals in Tir-Na-Nog. Assuming office, a new Shaman is gifted with a new torc to which carvings must be added. This is done by him alone for it builds the bond between man and spirit animal. The carved likenesses of wolf, hawk, leopard, and bear in the picture above are representations of Alexander Sinclair’s totem beasts; each called upon in turn for their tracking, eyesight, stealth, and attack power. Though not limited to these four, shifting is easier if there is a focus.
I am an artistic person, most often endeavoring in the drawing, painting, and sculpting mediums though I rarely find adequate time to devote to it anymore. Almost from the inception of the idea, I wanted to create this piece. I ended up waiting far too long, but have made it finally to coincide with the release of Reliquary’s Choice, the second book of the series. I am happy with the results mostly because I found a little of the magic in the creation.
Materials:
- Polymer clay (6 oz)
- Black aluminum craft wire (12 gauge)
- Clay sculpting tools (shapers)
- Rolling pin
- Tin foil
- Baking sheet
- Acrylic paint (ivory, cream, egg shell, linen, crimson, and metallic antique gold)
- Paintbrushes
- Wood stain (medium oak)
- Paper towels or cheese cloth
- Tin jewelry findings
- Super glue
Directions:
- Lay out a sheet of aluminum foil to protect the surface. I used an old baking sheet without edges as my work surface. Make sure that the sheet is no longer used for food. I used the same covered work surface to mold, sculpt, and paint the torc.
- Measure and cut a length of craft wire. Even though the torc pictured here is not wearable, I used my husband’s neck measurement to create a piece that is true to size as the one in The Celtic Prophecy series. This is my first attempt at making jewelry and the first time I have worked with polymer clay to this level of detail. Eventually, I would like to have it recreated into wearable jewelry.
- Bend the wire into the desired shape. For this I ended up having to use my husband as a model because the wire necklaces I have were too small to be used as a guide.
- Cut off pieces from the block of clay. I found through experimentation that working with 1-2 ounces of clay to be easier. I had to work the clay to get it malleable, then rolled it out to be about ¼ to ½”thickness. I wrapped it around the wire soothing the edges as I went. I continued this process until the whole form was covered.
- I found the images of the wolf, leopard, bear, and hawk beforehand and redrew them onto paper. I had to adjust the images to fit the size so I would have an estimation as to how the entire body of each animal would fit the diameter of the piece.
- Using a modeling tool that looks like a knife, I marked off the torc and started the basic outlines of the four animals. I made the impressions with the top third of the tool very lightly so if I had to readjust, it could make the corrections without too much difficulty. I did not transfer the images on paper to the clay, so I laid the paper as close to the section I was working on and transferred the image by eye.
- Once I had the placement to my liking, I went over the initial outlines again, making a deeper impression, using the same tool.
- Using a pick tool with a long, wicked-looking metal needle, I started laying in the detail of teeth, swirls, feathers, and fur. This was the most time consuming.
- Bake according to the polymer clay’s package directions and allow time to cool completely.
- Once cooled completely, paint the entire piece in a coat of ivory. Allow drying time.
- Water down crimson paint, 1 part water to 2 parts paint. Using a paint brush, work into all of the carved details. Be sure to wipe away the rest so all that remains is in the recesses. Allow drying time.
- Paint with the variety of ivory shades until reaching a satisfactory color. Allow drying time.
- Quickly wipe with stain. I was going for aged ivory, as described in my series, but it photographs more like aged bone.
- Paint the ends of the torc with the metallic antique gold. Allow for drying time.
- Bend the decorative tin pieces to fit the piece as seen in the picture below. I found the pieces in the jewelry aisle of my local craft store. I thought that I would be able to cinch them tight enough to the piece, but they needed additional support so I ended up having to use a super glue to hold them in place.
